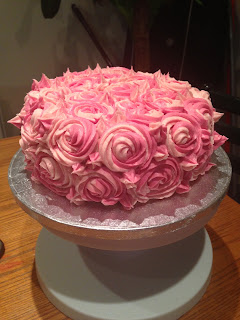
In aide of raising money for breast cancer awareness and research a group of colleagues organised a bake sale this week, so I thought this was a perfect opportunity to try my hand at a rose cake ... naturally a pink one.
I've seen many ideas and designs on the Internet, mostly through my hours spent trawling through images on Pintrest (I have to say what a fabulous idea it is...if you don't know about it, go check it out
here). I have combined many of the ideas I have read from various Internet sources and come up with this. I think it turned out quite well for my first attempt.
So here is how I did it....
Ingredients
250g unsalted butter - room temperature
250g golden caster sugar
1tsp vanilla paste/essence
5 large eggs, cracked into a jug
85g plain flour
100g Greek yogurt
250g self-raising flour
3 tbsp semi-skimmed milk
I also coloured my cake using a few drops of pink food colouring. I use the Sugar Flair paste colours as they are much more concentrated and don't interfere with the consistency of your mixture. For this cake I used the colour named **insert colour name here***
Syrup
50g golden caster sugar
1/2 tsp vanilla paste/essence
Method
- Heat oven to 160C/140C fan/gas 3. Grease a round, deep 20cm tin, then line the base and sides with non-stick baking paper.
- Using electric beaters or a tabletop mixer, beat the butter, sugar, vanilla and ¼ tsp salt together until pale and fluffy, then pour in the eggs, one at a time, giving the mix a really good beating before adding the next. Add 1 tbsp of the plain flour if the mix starts to look slimy rather than fluffy. Beat in the yogurt.
- Mix the flours; then, using a large metal spoon, fold them into the batter, followed by the milk. Spoon the mix into the tin and bake for 1 hr 20 mins or until well risen and golden - a skewer inserted into the middle should come out clean.
- Meanwhile, make the syrup by gently heating 50ml water with the sugar and vanilla in a pan until the sugar dissolves. Set aside. Once the cake is out of the oven, leave to cool for 30 mins in the tin, then use a skewer to poke holes all over the cake, going right to the bottom. Pour the syrup over, letting it completely soak in after each addition. Leave to cool completely before icing.
In light of the occasion I made my cake pink by adding some paste colour before baking it, but you can of course leave it plain.
Once the cake is cool you can commence icing it. This design uses butter cream icing, and lots of it.
The recipe I like to use is from the Hummingbird Bakery as is as follows...
Ingredients
150g Icing Sugar
80g Butter, softened to room temperature
25ml Milk
1/2 teaspoon vanilla essence/paste
Method
1. Cream the butter and icing sugar until they come together using a handheld or standards electric mixer.
2. Mix the milk and vanilla in a jug and pour gradually into the butter and sugar mixture, beating continuously.
3. Turn the mixer up to high speed and mix until light and fluffy. The more you mix it, the lighter your butter cream will be.
If you want to colour the icing you can add the colour during step 3. Once again, I used paste colours as they don't interfere with the consistence of the icing.
To ice this cake I used 3 quantities of this recipe. If you have any left over you can freeze it, just remember to beat it for a minute or so when it's defrosted before you use it next time.
I have made mine into 3 different shades. White for the base coat of the cake and 2 different shades of pink for the decoration.
First of all you need to cover the cake in a smooth layer of white butter cream to form the base coat of your icing.
Next you want to fill your piping bag with pink icing. I chose to use both shades of pink in the same icing bag, but you could chose to do one layer of each colour, or graduate the rose decorations in different shades. It's all up to you. To get the rose shape, I am using a 1M piping nozzle.
I started by piping roses around the sides of the cake. To pipe each rose, simply start from the inside of the flower, and work your way out in a circular motion. You can make each rose as big or as small as you like. Mine are about the same size as an average cupcake.
Then simply carry on covering the cake with the rose design until you have covered the entire surface of the cake. Then you're done. See, it wasn't that hard was it? :)
Stay tuned for some more cake tales as I have 2 special projects on the go over the next few weeks.
Happy Baking!!


