Pages

Saturday 3 November 2012

Happy Birthday Anya!

So this weekend has been my second real project cake: a 1st birthday cake for the gorgeous Anya who turned 1 a few weeks ago.

This one didn't turn out exactly how I had planned it out in my head, but rather a lot more of an 'improvisation along the way' kind of job. But I'm still pleased with how it turned out. And like with every cake I make, I learned a few valuable lessons along the way.

So here it is, a beautiful celebration scene for a beautiful little girl.


And here is how I did it. 

My initial intention was to make a fanfetti cake like this but for some reason all my 100's and 1000's disappeared into the cake when it was in the oven ... so it's pretty much just a plain butter cake. That was the first thing that didn't go according to plan. The second was the size of the cake. I had intended to make one large block with Anya's name around the 4 sides, however the 6x6" size I made would have only been 4" tall with the 1 quantity of cake mix the recipe made. So, again I improvised and decided to cut the 2 6" cakes into 4 individual squares and make 4 blocks to spell Anya's name, as you can see below.  


Next it was assembly time. I used vanilla buttercream (same recipe as I usually use) to sandwich the 2 layers of each block together and then covered each block with a layer of buttercream to form the base layer for the rolled fondant. This was a little tricky and messy but the cakes are sturdy enough to withstand a bit of handling. A good tip if you find you buttercream difficult to spread is to dip you palette knife in some hot water. Make sure you dry it off as you don't want any excess water in your buttercream, but it will make spreading it, especially around the sides of your cake a lot easier.


Next was the rolled fondant. I used Ivory for the base colour just because I didn't want it to be bright white, but you could use any colour you like. I was tempted to go with a pale yellow colour but decided to stick with the ivory as it meant one less batch to colour by hand. 

I rolled out the ivory and covered each block. This once again was a bit tricky and I tried a few different methods. The one I found most successful was to cut along strip of fondant that is the width of the cake (in this case 3"x3") and then wrap it around the sides of the cake. Then cut out at 3"x3" square for the top of the cake. I used a ball tool to smooth the joins, but since I was planning to cover the sides with buttercream I knew no one would notice the join lines. 

I then cut out letters (making sure I had one letter form Anya's name in each colour) from 4 different colours of fondant which I coloured using Sugarflair paste colours.  Sticking them onto the 4 cakes was simple: just brush the back of each letter with a small amount of water and stick on. 


Next it was the buttercream. Once again, coloured using Sugarflair paste colours. I piped tiny roses around each of the 3 sides of each block before lifting the cake using a spatula onto the covered board. Then I piped roses along the bottom edge of the cake, making sure to cover the join with the board.

All the decorations (Pooh, hunny pot and Butterflies) I made a few weeks ago and left to dry in a cardboard box on my bookshelf. I simply then stuck them around the cakes and on the board with a bit of buttercream and we are done.


All up this cake probably took me about 5 hours to make, but making the decorations ahead of time certainly saved me time last night.  If I was to do it again I would also cut out the letters ahead of time as that is the time consuming part as you have to colour the fondant, roll it out and cut out the letters. There is no reason why they couldn't be done weeks ahead and left to dry. 

Sunday 28 October 2012

Up up and away.....

So, like I said last week I have a few project cakes in the coming weeks and toady saw the first: a cake for a farewell party for some lucky friends who are going off on a round the world trip.


So, here is how I did it. I made a 10" square chocolate Guinness cake using 2 quantities of the recipe I used in my first post, and layed it out on a 14" cake board, as you can see in the below picture. I chose to put mine off centre, but you could place it wherever you like on the board.


Next it was covering the cake. First I covered it in a crumb coat of plain buttercream, followed by some light blue fondant rolled out to fit the cake and the board.


Then it was time to decorate it. I cut out some clouds using a stencil image that I printed on the computer, and stuck them on using a bit of cold water and a paintbrush. The aeroplane I made ahead of time using white fondant and a little black for the decorations. Left to dry in a cardboard box it hardened nicely making it easier to place on the cake. Make sure you don't put any fondant decorations in an airtight container as they will sweat and so limp. Either leave them in open air or in a cardboard box to dry.


Some text cut out using an alphabet cutter and placed delicately on the cake along with some suitcases made from fondant and you're done. A simple piece of blue ribbon wrapped and glued around the side of the cake board for a finishing touch.


Sunday 21 October 2012

Cake to cure breast cancer

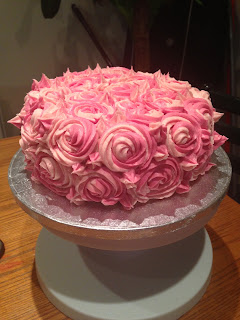
In aide of raising money for breast cancer awareness and research a group of colleagues organised a bake sale this week, so I thought this was a perfect opportunity to try my hand at a rose cake ... naturally a pink one.

I've seen many ideas and designs on the Internet, mostly through my hours spent trawling through images on Pintrest (I have to say what a fabulous idea it is...if you don't know about it, go check it out here). I have combined many of the ideas I have read from various Internet sources and come up with this. I think it turned out quite well for my first attempt.


So here is how I did it....

Ingredients

250g unsalted butter - room temperature
250g golden caster sugar
1tsp vanilla paste/essence
5 large eggs, cracked into a jug
85g plain flour
100g Greek yogurt
250g self-raising flour
3 tbsp semi-skimmed milk

I also coloured my cake using a few drops of pink food colouring. I use the Sugar Flair paste colours as they are much more concentrated and don't interfere with the consistency of your mixture. For this cake I used the colour named **insert colour name here***

Syrup

50g golden caster sugar
1/2 tsp vanilla paste/essence

Method

  1. Heat oven to 160C/140C fan/gas 3. Grease a round, deep 20cm tin, then line the base and sides with non-stick baking paper.
  2. Using electric beaters or a tabletop mixer, beat the butter, sugar, vanilla and ¼ tsp salt together until pale and fluffy, then pour in the eggs, one at a time, giving the mix a really good beating before adding the next. Add 1 tbsp of the plain flour if the mix starts to look slimy rather than fluffy. Beat in the yogurt.
  3. Mix the flours; then, using a large metal spoon, fold them into the batter, followed by the milk. Spoon the mix into the tin and bake for 1 hr 20 mins or until well risen and golden - a skewer inserted into the middle should come out clean.
  4. Meanwhile, make the syrup by gently heating 50ml water with the sugar and vanilla in a pan until the sugar dissolves. Set aside. Once the cake is out of the oven, leave to cool for 30 mins in the tin, then use a skewer to poke holes all over the cake, going right to the bottom. Pour the syrup over, letting it completely soak in after each addition. Leave to cool completely before icing. 
In light of the occasion I made my cake pink by adding some paste colour before baking it, but you can of course leave it plain.

Once the cake is cool you can commence icing it. This design uses butter cream icing, and lots of it. 

The recipe I like to use is from the Hummingbird Bakery as is as follows...

Ingredients

150g Icing Sugar
80g Butter, softened to room temperature
25ml Milk
1/2 teaspoon vanilla essence/paste

Method

1. Cream the butter and icing sugar until they come together using a handheld or standards electric mixer.
2. Mix the milk and vanilla in a jug and pour gradually into the butter and sugar mixture, beating continuously. 
3. Turn the mixer up to high speed and mix until light and fluffy. The more you mix it, the lighter your butter cream will be. 

If you want to colour the icing you can add the colour during step 3. Once again, I used paste colours as they don't interfere with the consistence of the icing. 

To ice this cake I used 3 quantities of this recipe. If you have any left over you can freeze it, just remember to beat it for a minute or so when it's defrosted before you use it next time. 


I have made mine into 3 different shades. White for the base coat of the cake and 2 different shades of pink for the decoration. 


First of all you need to cover the cake in a smooth layer of white butter cream to form the base coat of your icing.


Next you want to fill your piping bag with pink icing. I chose to use both shades of pink in the same icing bag, but you could chose to do one layer of each colour, or graduate the rose decorations in different shades. It's all up to you. To get the rose shape, I am using a 1M piping nozzle.


I started by piping roses around the sides of the cake. To pipe each rose, simply start from the inside of the flower, and work your way out in a circular motion. You can make each rose as big or as small as you like. Mine are about the same size as an average cupcake. 


Then simply carry on covering the cake with the rose design until you have covered the entire surface of the cake. Then you're done. See, it wasn't that hard was it? :)


Stay tuned for some more cake tales as I have 2 special projects on the go over the next few weeks. 

Happy Baking!!

Thursday 9 August 2012

Tantalising Thai - who fancies a Red Curry??

OK....so the Thai flavours are, I would have to say, my favourite combinations around. Spicy Chili, tempered by the tangy lime, cool coconut and amazing coriander. Whether it's a curry, Phad Thai or even a Thai salad ... if it has Lime, Coriander, Chili and Coconut in it ... I'll eat it!

The Thai curry has become a regular favourite in our kitchen, be it red or green, and the options really are endless when it comes to what you wan to put in it. I don't eat seafood, so my curries are usually chicken, and my only other rule is red vegetables for a red curry and green vegetables for the green curry. This isn't a Thai rule.... it's just my rule......My kitchen...my rules :)

So, onto the recipe. This is one from Jamie Oliver's 30 Minute cook book, although I think the only part I follow in his recipe for the paste. Whilst this book is a great source of recipes for quick meal ideas, I don't think I've made one complete meal from it. Like I said, my kitchen my rules. Jamie's 30 minute meal book is a reflection of his taste and flavour combinations. If you don't like something ... don't use it. For me, cooking is about creating something that suits your tastes. Just because a famous TV chef says something in a recipe, doesn't mean you have to follow it to the letter.  But anyway, this isn't a review of Jamie Oliver...so lets get on with the curry.

Thai Red Curry

These quantities should serve 2-3 people

500g chicken breast, cut into bite size pieces
1 x 400g can coconut milk
4-5 tomatoes, cut into 4-8 pieces each
1 red pepper, cut into bite size pieces

1 lime to serve
1 pack prawn crackers to serve
handful coriander leaves to serve

Red Curry Paste

2 stalks of lemongrass
1 fresh red chill
2 cloves of garlic
Optional: 4 faffir lime leaves
A bunch of fresh coriander
2 jarred red peppers in oil
1 heaped tea spoon of tomato puree
1 tbsp fish sauce
2 tbsp soy sauce
1 tsp sesame oil
2cm piece fresh ginger


Method

1. Roughly chop all ingredients for the paste and place them all in a bullet blender, or a tall container for use with a stick blender. Blend into a tick paste. 
2. Place a little olive oil into a wok on medium heat, add the chicken and brown slightly, along with 1-2 tablespoons of the red curry paste. Cook through for a few minutes until the chicken is browned. 
3. Add the remaining paste to the wok, followed by the coconut milk. Simmer for 3-4 minutes.
4. Add the tomatoes and red pepper. Cover and simmer for a further 10 minutes or so on a low heat. The tomatoes will start to break down a bit. When this happens you know it's ready. Make sure you stir regularly

I serve this dish with some sticky Thai rice or basmati rice. You can serve it all in one bowl, or in an individual bowl like I have done. Coriander leaves for decoration, and some prawn crackers and you're done.

Happy cooking. :)


Sunday 8 July 2012

Hummingbird is my inspiration

Have you been to one of Hummingbird Bakery's stores? If not, make sure you do. When you are there you can pick up one of their recipe books and take the amazing tastes and treats home with you. This is where my recipe for today's blog has come.

I have made quite a few things from the Hummingbird books but I with the help of a new piping set I picked up at Lakeland, I think these cupcakes are my best effort to date.

I chose to go with the chocolate cupcakes as I wanted to focus my attention today on the icing and decorating as opposed to the cake. You can find it on Page 17 of The Hummingbird Bakery Cookbook I'm very careful these days not to overcook my cakes so as not to dry them out. I always put the timer on for a few minutes less that the shortest time recommended in the recipe. You can always put them back in to cook a bit longer, but you can't uncork them.

Once the cakes were backed and left to cool on wire racks I moved to making my buttercream icing.


I made double the quantity of cakes, so went for 1 quantity of vanilla buttercream and 1 quantity of chocolate buttercream, each from page 11 of the book. As it states in the book, the trick is to beat the buttercream as much as possible to get a light fluffy consistency. 

I also went with some fondant decorations for my cakes: just some simple designs cut out using plunge cutters you can pick up at any store that sells baking tools (or Amazon like I did). However, the one tool I couldn't have done without in this instance was my piping set that I picked up at Lakeland last weekend. I have struggled in the past piping buttercream on cupcakes and the nozzles I had were so small. Upon spotting these ones at Lakeland last weekend on a trip to Bath I couldn't get to the register fast enough to hand over my hard earned pounds. You can find the one I got on Lakeland's website here

So, with some pink vanilla buttercream and some chocolate buttercream and a few flowers and stars made from rolled fondant that I dyed with some food colouring I carted the following cakes which were absolutely delicious!!!!


Saturday 16 June 2012

Dad's Lasagne

A friend recently asked for me to re-write this recipe out for her as she lost it, and loved it so much. However, I thought instead that I would post it here for you all to share. This recipe actually isn't mine, but rather one that was taught to me by the person that introduced me to the kitchen and cooking: my father. As far as I can remember it was one of the first things he taught me to make from scratch and I am sure he will be pleased to see it being enjoyed by so many people.

So here it is, a hearty winter lasagna that is sure to fill you up on a cold winter's night. I have started making and rolling my own pasta after recently buying a pasta machine, but the dried pasta sheets are fine for this recipe. 

The recipe should make enough to serve 6 people. 

Ingredients

Bolognese Sauce

500g Beef mince
1 medium onion, finely chopped
1 pepper, finely chopped - you can use any combination of red green and yellow
2 sticks of celery, finely chopped
2 bulbs garlic, crushed
2 x cans peeled or chopped tomatoes
1/2 - 1 tube tomato puree - add this to taste however you like it
1/2 teaspoon Oregano 
1/2 teaspoon Mixed Herbs
1 Pinch chili flakes
1/2 teaspoon dried basil - if you have fresh Basil, use approx 3-5 medium sized leaves
Red Wine
Salt and Pepper to taste

Cheese Sauce

1 x knob of butter
2-3 tablespoons of plain flour
Milk
1-2 teaspoons of hot English mustard
1 x hand full cheddar cheese, grated
1 x hand full mozzarella cheese, grated
1 x 500g tub Natural Yogurt

Lasagna

1 packet lasagna sheets
Mozzarella cheese, grated - I usually buy a 200g packet and use a handful for the cheese sauce and the remainder for the lasagna
Cheddar cheese, grated - you probably want around 200g
200g Greek Feta cheese


Method


First you want to make the bolognese sauce. I sometimes make this in advance and freeze it. You can then just defrost it and use it on pasta or to make a lasagna.

1. In a large, heavy based saucepan, brown the mince over a medium heat. This should probably take 5-10 minutes. Remove from the saucepan and drain the fat away over a bowl.
2. Add a little olive oil to the pan, place it back on the heat and brown the onions for a few minutes before adding the peppers and celery. Add the garlic, herbs and chili flakes and fry for a further 2-3 minutes.
3. Add the canned tomatoes (if they are not chopped you can use a knife to break them up using the back of a wooden spoon in the pot) and mix in the vegetables.
4. Add the mince to the pan, along with the tomato puree (I use a whole tube, but it depends how thick you prefer the sauce as to how much you want to add). You will either need to add a good glass of red wine to thin out the sauce, or just some water if you don't have any wine handy.
5. Leave the sauce to simmer on a low heat, stirring regularly whilst you prepare the remaining items.

Secondly you want to make the cheese sauce. Once again you want a heavy based saucepan as you need to make a rue to start with (for instructions on how to make a rue click here).

1. Make a rue using the flour butter and milk as required. Make sure not to make it too runny as you are adding the yogurt to the sauce which will thin it out.
2. Once the rue is complete, add the yogurt, cheese and English mustard and stir well.
3. The sauce should be quite thick as the cheese melts.

Now it's time to assemble the lasagna, which I don't think I really need to explain in detail. In brief, I start with a little bit of bolognese sauce just to ensure the pasta doesn't stick to the bottom of the dish. Then layer pasta, cheese and bolognese sauce alternatively until you approach the top of the dish. I usually get 3 layers in the average size lasagna dish. After the 3rd layer of pasta, top it with bolognese sauce, and then pour the cheese sauce on top, making sure not to overflow the dish as it will bubble up in the oven. Sprinkle the remaining cheese on top, followed by the feta cheese, cut or crumbled into small pieces. This part is my favourite of the entire dish as the feta goes brown and crispy on the outside and gooey in the middle once the lasagna is cooked.

Place the dish in the oven and bake for about 20 - 30 minutes (I usually put another disk underneath it in the over to catch any overspill as burnt lasagna is a nightmare to clean from inside your oven). It will be done when the top is golden brown, and the pasta feels cooked when a knife is inserted into the centre of the dish.

The one piece of advice I would give it try not to make either your bolognese or cheese sauces too runny as it can make serving the lasagna a bit messy.


Saturday 2 June 2012

Bank Holiday baking - Jubilee style

With the Queen's Diamond Jubilee celebrations gripping the country, I though it only fitting dedicate my baking this weekend to the celebrations.

So, as I was invited to a Queen's Jubilee party on Sunday I offered to bring a cake. I've once again used the recipe from The Hummingbird Bakery for their Chocolate Guinness cake that I made a few weeks ago (see here for recipe).

This time, instead of covering the cake with cream cheese icing, I decided to use rolled fondant to cover the cake and decorate it in a jubilee themed union flag.

Chocolate Guinness cake covered in butter cream and rolled white fondant.

After covering the cake in white rolled fondant I decided to add the base decorations of polka dots. I simply rolled out some red and blue modelling paste and used the large end of a nozzle from my piping set to cut out some large polka dots. Then it's just a matter of simply wetting them with a little bit of warm water (I soaked a clean blue cloth with cooled boiled water and then just rested the dots on it to absorb a bit of water so as not to destroy their shape by over handling) and attaching to the cake.

Guinness cake covered in rolled fondant and polka dots made from modelling paste. 

Next was the flag to top the cake. I simply printed out a template of the flag and cut it up into it's components before tracing the pieces out in red and blue modelling paste that I had rolled out. I left mine resting on some spoon handles to give it a 3D look when placed on top of the cake.

Flag made of modelling paste.

Finally, the assembly. I made the mistake of putting the flag onto the cake a bit early so some of the flag cracked a little. (I left it drying for about 6 hours. I would recommend leaving it for at least 24 hours to dry completely before moving it, especially if it needs to hold a shape).


Chocolate Guinness cake complete with Jubilee decorations and Union flag. 

Saturday 26 May 2012

Summer time Thai salad

I was beginning to think that the day would never come when summer 2012 would decide to poke its head through the big, miserable grey clouds. Obviously my fears have been averted as the UK basks in the first glorious heat wave of the year. So, in the spirit of the warm weather my menu plan for the week was adjusted from the hearty winter soups and curries to some lovely summer dishes, including this one: a Thai grilled chicken salad. The Thai flavours: chilli, lime, ginger and coriander have to be my favourite combination of flvaours and are great in both a curry in winter, or a salad like this in summer.


I cooked my chicken on the BBQ, but it would work just as well on a griddle pan on the hob, or even a plain old frying pan. The BBQ obviously gives you a bit more of a smokey flavour though. 


Thai grilled chicken salad
I pulled this recipe together from a combination of other recipe ideas I found. I just added things I liked, and removed things I didn't. The figures below are just a guide. You can adjust this recipe to feed as many of you like. Just use your judgement and add as much or as little of everything as you like. The quantities below serves 3.


Ingredients

1 Carrot sliced into matchsticks
4 Spring onions, sliced 
1/4 Cucumber, sliced into matchsticks
1 hand full Cherry tomatoes, chopped in half
1 small bunch fresh coriander leaves
1/4 red & yellow peppers, sliced into matchsticks 
100-200g vermicelli noodles, dry or wet is fine (depends how much you want to make. Add more noodles to make the salad go a bit further.)
1 2cm piece fresh ginger, sliced or chopped finely
300g Chicken breast pieces.
2 lime wedges per person


Optional extras
1/4 small cabbage, finely sliced 
1 hand full bean shoots
1/4 Mango, finely sliced
Fresh Chilli, red or green, finely sliced

Marinade/Dressing
I make this up twice. Once to marinade the chicken before I cook it, and once to pour over the salad. Once again, make it to taste depending on how much you like. 


  • 1/4 cup sweet chilli sauce
  • 3 teaspoons fish sauce
  • 2 tablespoons lime juice

Method

1. Slice the chicken breasts into large pieces, but small enough to cook quickly. You should get 2-4 pieces  from each average sized breast piece. Place in a large bowl with marinade and place in the fridge for at least 20 minutes.

2. Prepare vegetables and place in a large salad bowl, tossing when complete (including optional extras if using)

3. Cook the chicken. If using the BBQ, make sure the coals are hot and no longer flaming. It will probably take anywhere between 8-15 minutes depending on the temperature of the BBQ and the size of the chicken pieces. The best way to tell if it's done is to take the biggest piece off the heat and slice it in the middle to check it. Make sure you use any remaining marinade in the bowl to baste the meat whilst it's cooking.

4. Once cooked, remove from the BBQ/pan and slice into strips.

5. Dress salad with second quantity of the dressing/marinade and toss. Assemble on the middle of your plates. Pile sliced chicken (and mango if using) on top of the salad and serve with lime wedges and enjoy.


Sunday 20 May 2012

A country drive


With the purchase of a new car completed, we thought we would expand our horizons and par-take in the fabulous British tradition of a Sunday pub lunch, this time in the countryside. As such, today we decided to take a trip to one of the few Michelin stared pubs in the UK: The sir Charles Napier in Oxfordshire.  

A quaint, cosy pub on a country road was our destination after a frustrating crawl through the south west London traffic.  Walking through the front door we were greeted by welcoming staff, a cosy front room, complete with log fire, and rustic country bar. Window sills and tables adorned by an eclectic collection of stone and marble sculptures (my favourite was the hippopotamus in the ladies bathroom) gave the rooms an interesting talking point, whilst the low ceilings and exposed beams provided a cosy, country feel. 

Lunch for all 3 of us consisted of the Roast loin and shoulder of middlewhite pork with apple sauce and crackling, which was perfectly cooked and accompanied by some of the best roast potatoes I've ever had. I had intended to have the Roast sirloin of local beef, but it had sold out by the time we arrived at 3pm, so a tip to anyone planning a trip is to go early if you want the pick of the menu. Dessert for my 2 lovely companions was sticky toffee pudding with banana Millie-feuille and passion fruit sorbet, whilst I tried the Chocolate Pavè with honeycomb and lime ice cream. Both were what we all thought to be unique flavour combinations, but worked extremely well! 

A quick stroll around the beautiful gardens (missing a croquet pitch we felt haha) complete with a few more resident statues was a lovely finish to a perfect afternoon in the English countryside. I could certainly see the gardens full on a lovely summer's afternoon. 

If you are ever in the area and fancy a fabulous lunch I'd certainly recommend the Sir Charles Napier (although remember the prices do reflect their possession of a Michelin star). A perfect afternoon away from the hustle and bustle of the big city with some amazing food thrown in.

Monday 7 May 2012

The begining

The Bank holiday is the perfect time to catch up on all those things you have been meaning to do for so long, but never seem to have the time for. For me, this blog is one of those things. It's something I have been thinking about for a while but has never really been that important that I could prioritise it above getting the washing done and attending people's birthdays. 


So, from now on (at what will probably be irregular intervals as life always has a way of getting in the way of things want to do with things you have to do) I intend to share some of my cooking and baking experiences with you, so stay tuned. 


For this weekend I leave you with a cake recipe that I have discovered. The A-Mazing 'Hummingbird Chocolate Guinness Cake' (which can be found here). It's so good I couldn't wait to take a picture before having a second slice!


Free Blog Template by June Lily